
EG-CTF 2019 ‘DGA’ challenge writeup
Introduction
EG-CTF 2019 was held on 15-Nov-2019, most of the challenges were written by people working at EG-CERT, this challenge is not one of those challenges, as I am not working at EG-CERT anymore .
This challenge was not solved during the competition, which is quite sad, I designed it to take some effort, however, the duration of the CTF was sufficient, as you will see from the writeup.
Problem statement
This file has a DGA, we want to know when the following domain is/was contacted "egT.fAErxJ.dGS.chq.mABcfYnHI.atPhIX.dgR.org". Submit the flag using the following format: EGCTF{unix timestamp} .

For example: if it contacted the domain on Thursday January 1 1970 12:00:00 AM GMT+0, submit EGCTF{0}

Tip: use https://www.epochconverter.com to create the timestamp, and use GMT timezone if needed.

https://github.com/11x256/11x256.github.io/blob/master/binaries/ch2
The challenge is written in GO, which is a “modern” programming language by Google. This is what encouraged me to learn it, I wanted to see what is a “modern” programming language, probably you should too :D.
The difficulty of the challenge comes from the fact that it is compiled for ARM 64 architecture. This architecture is not commonly used in CTFs, which means that not many players have experience dealing with it. Also the symbols are stripped from the binary, so the first step will be to find the main function.
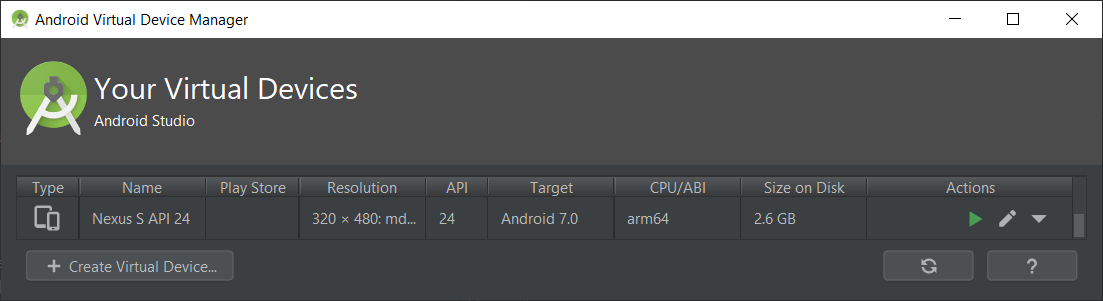
Before taking the first step, lets run the binary. But how can we run a binary for a different architecture? The answer is to buy another device(Raspberry PI or android device) or use QEMU.
You can search for a tutorial on how to run an ARM64 machine using QEMU, or use an android VM from android studio, which is the fastest solution, I guess.
Now, we have to push the binary to the device and execute it using the following commands:
adb push ch /data/local/tmp
adb shell
The following commands are executed on the android device.
chmod u+x /data/local/tmp/ch2
/data/local/tmp/ch2
You will notice that the binary takes a few seconds before printing the generated domain. This delay is intentional, and it is added to prevent players from solving it using a black box approach![]() .
.
You can execute it a few times, and you will notice that the output changes in every time. Now, lets move to the first step.
Finding the main function
If the binary was not stripped, you would find a method named “main.main”, which is the main function. But since it is stripped, we will need to make some effort in order to find it.
We will do a very simple thing, we will write a hello world program in go, compile it for ARM64 and keep the symbols.
package main
import "fmt"

func main(){
	fmt.Println("test")
}
env GOOS=linux GOARCH=arm64 go build test.go
We can add another small step here. We will find out the version of go used to compile the binaries.
go version
go version go1.13.1 windows/amd64
The result shows that we have version 1.13.1 on a windows machine and yes I am not the hacker who does not use windows ![]() .
.
We can use strings.exe, grep.exe to search for the version number in the challenge binary.
λ strings.exe ch2 | grep "go1."
        stack=[asimdfhmasimdrdmcgocheckfault   go1.13.1lr      no anodepc      r0      r1      r10     r11     r12     r13     r14     r15     r16     r17     r18     r19     r2      r20     r21
     r22     r23     r24     r25     r26     r27     r28     r29     r3      r4      r5      r6      r7      r8      r9      readlinkrunnableruntime.scavengesp      unknown( (forced) -> node= blocked= defersc= in use)
As you can see from the output that the version numbers are identical, I did not try with different versions, maybe you can try that and see if you will obtain the same results.
Now, lets open the 2 binaries in IDA, the one we built with symbols and the challenge.
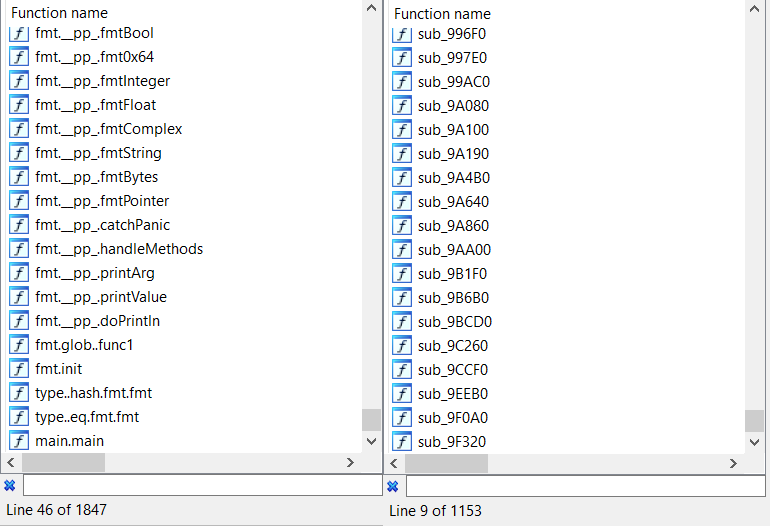
On the left side you can see that IDA identified 1847 functions with their names, and on the right side, only 1153 without names (symbols).
Luckily, the main function is the last function in both of the two binaries, sub_9f320 is the “main.main” in the stripped binary, so easy🤦♂️.
But, lets ignore the previous line, and try to identify it using a more effective method. We will compare the two binaries, and we will try to identify the functions that are present in both of them, our target should be “fmt.Println”, or other IO functions that can print to the stdout as we saw when we ran the binary on the android emulator.
Diaphora is a great plugin for IDA that can do this function matching for us. Sadly, the plugin could not match our target function “fmt.Println”, but it matched “fmt.doPrintln” with a matching ratio of 98%.
So now we know where is “fmt.doPrintln” in the stripped binary.

By checking the cross references of “fmt.doPrintln” in the test binary, we can see that is called by only one function (“fmt.Println”), our target function. Also by checking the cross references of “sub_9EEB0” in the stripped binary, we can see that it is also called by one function, which must be “fmt.Println”, at least we are 98% sure of that.
Now by cross referencing the target function in the stripped binary, we find that it is called from only one function, and that function is not called from any other functions, so it is probably the “main.main” function.
Reversing the main function
I am not that good with ARM architecture, so I will keep try to finish this part as soon as possible, my target in this step is to try to figure out why does the binary take a few seconds to execute. If I can make it execute fasters, then solving it using a blackbox approach will be feasible.
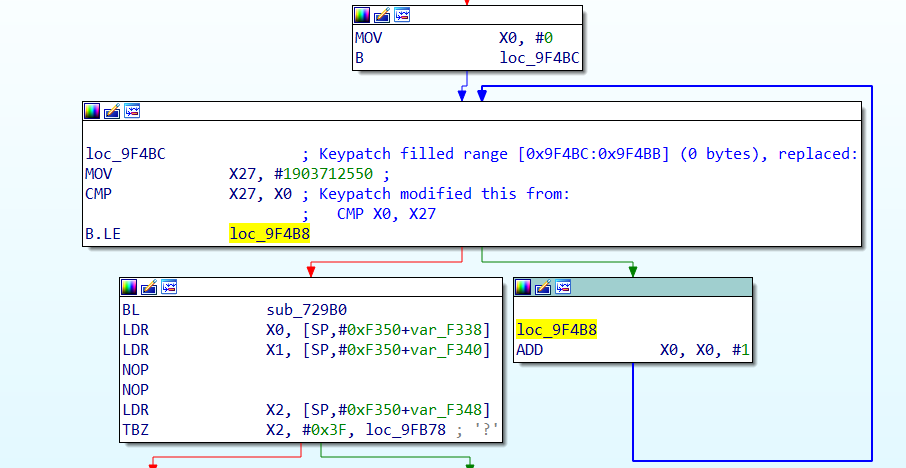
These blocks are the counter measures added to prevent the blackbox approach, a basic for loop that will loop for 1903712550 times, in each iteration it does nothing. X0 is a register and is used as the loop counter, and its value is overwritten as soon as the loop ends, so this loop is a dead code.
In order to get rid of it, I swapped the registers order in the CMP instruction, so that the loop will not execute any iterations, as you can see from the comments added automatically by keypatch plugin.
There are 7 other loops like this in the binary, patch them all ,save the new binary and close IDA, we are done reversing for now.
Blackbox approach
If you run the patched binary on the android emulator, you will see that it now executes in less than a second. Which means that we can try to bruteforce the flag.
Also, you should have noticed that the output consists of 8 parts separated by dots, and that only a few parts change every time. Since we know that the binary behaves like a DGA, we can assume that the parts that change represent the current second, and the other parts represent the rest of the units of time (minutes, hours , days, months, years). We do not care about the fractions of a second, because they are not represented by the Unix timestamp.
We can execute the bruteforce attack using DBI ( https://en.wikipedia.org/wiki/DynamoRIO ), emulation ( https://www.unicorn-engine.org/ ) or by running the program on the target device.
The first two methods will require more analysis of the binary in order to find what function is called to get the current timestamp, which is doable using the same approach we used to find the main function.
I will use the latter method, because it is the easiest method, I wrote a python script that will automate that process. The script will generate pairs of commands, the first command will set the time on the device, the second command will run the binary and log the output. Then the output will be inspected manually to determine whether the attack was successful or not.
cmd1 = "date 010203042019.xx >> /data/local/tmp/res"
cmd2 = "/data/local/tmp/ch2_patched >> /data/local/tmp/res"

res = []

fout = open( r"E:\temp\eg-ctf\rev-egctf\go_dough\writeup\aa.sh" , 'w')
for i in range(0, 60 ,1):
    res.append(cmd1.replace("xx" , "%02d" % i))
    res.append(cmd2)

fout.write(" && ".join(res))
fout.flush()
fout.close()
date command will set the date, we will start by bruteforcing the value of the seconds field. Hopefully we will get a correct result. The python script produces 60 pairs to try all the possible values of the seconds field, and the output will be appended to /data/local/tmp/res file.
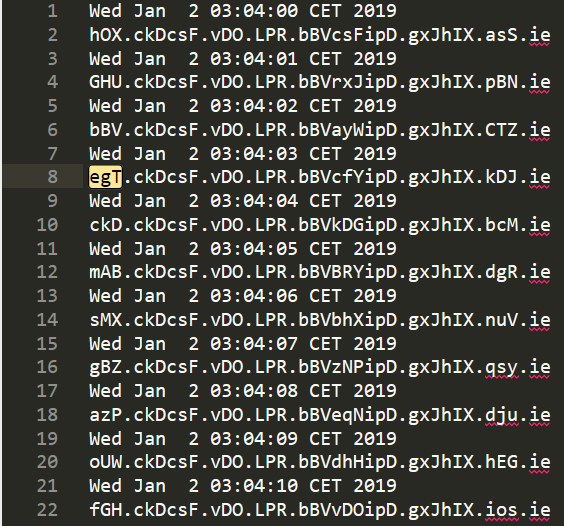
This is a snippet of the result of bruteforcing the seconds field, as you can see, more than one part changes based on the value of the seconds filed, but the first part depends exclusively on the value of the seconds field, you can verify that by changing the other fields and checking whether the first part will change or not.
So the correct value for the seconds field is : 3. Now repeat the same steps until you get the rest of the fields.
second == 3
minute == 44
hour == 6 - 1
day == 21
month == 3
year == 2055
Remember that the hour field will change based on the timezone of your device.
flag : EGCTF{2689220643}